Playing Around With HTML5's Canvas
Friday, 10th August 2012, 16:19
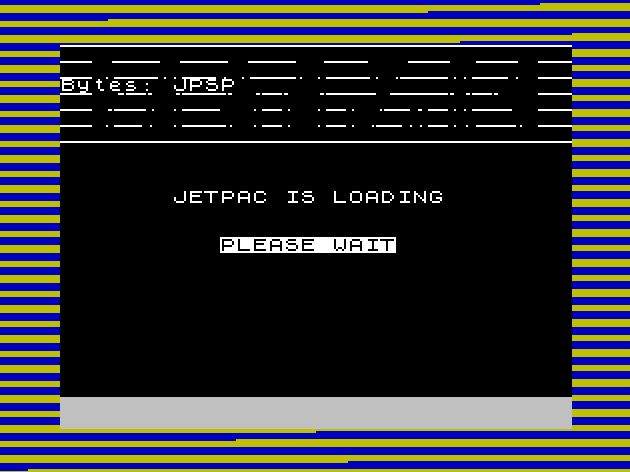
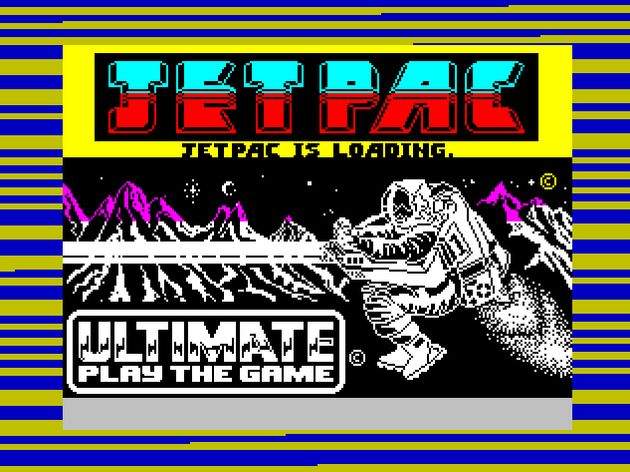
I've read and played with some HTML5 demos, in particular Canvas related ones, but never really quite had a call to use it yet. But since playing around with stuff is always fun, it occurred to me a few days ago that a good thing to check it out with would be simulating the loading screen process of the ZX Spectrum. If you don't know what that is, watch this...
Now you have the idea, just a note on what I was initially trying to achieve as a first stab. It's important to aim for something achievable, so for now sound is out, because that would require generating an mp3 server side, and then synchronising it with the loading process. Not impossible, and I'll definitely look at it when I explore the sound side of things, but for now, sound is out.
Also not immediately achievable is the flashing border effects. The nature of these is such that to accurately emulate the border we'd need to time T-states, which is heavily into the realms of emulator territory. I can think of a few shortcuts that might be possible to approximate it, but too complicated for now.
TL;DR
Here is the link to the first version of my ZX Spectrum Loading Screen Simulator:
http://www.robertsworld.org.uk/spectrum_loading_screen_simulator
The <Canvas> Element
First job of the day, create a Canvas tag and give it a width and height. After some experimentation, it appears when you set the width and height attributes, that is the underlying resolution of the bitmap representation of the element. If you want to scale it, then you can do that by specifying width and heights in CSS.
canvas#spectrum
{
   width: 512px;
   height: 384px;
}
<canvas width="256" height="192" id="spectrum">
   Your browser does not appear to support HTML5 :(
</canvas>
So this gives us a 1:2 mapping of pixels on our element, which means we can treat the Canvas itself as being the same resolution as our ZX Spectrum screen, but it will be displayed twice the size on the actual page.
The downside of this, anti-aliasing makes pixel images look rather poop, we need to double the size. So we change the latter width and height to 512x384, matching the CSS for it.
Next we need to get the context for the canvas object, which we do via jQuery, and create an image data object which will become a virtual screen for our Speccy:
var conCanvas = $("canvas#spectrum")[0].getContext("2d");
var imgData = conCanvas.createImageData(256 * 2, 192 * 2);
Every virtual screen update period, in our case 25 times a second, we will put this image back to the canvas with the following:
conCanvas.putImageData(imgData, 0, 0);
Then we'll use two functions which "poke" our data. Normally we'd just need one, but here we actually have to set 4 pixels for every 1, because our bitmap is twice the width and height.
function setPixel(x, y, colour)
{
   var pos = ((x * 2) + ((y * 2) * (2 * 256))) * 4;

   pokePixel(pos, colour);
   pokePixel(pos + 4, colour);
   pos += (256 * 2) * 4;
   pokePixel(pos, colour);
   pokePixel(pos + 4, colour);
};

function pokePixel(pos, colour)
{
   // Red
   imgData.data[pos++] = colour.r;
   // Green
   imgData.data[pos++] = colour.g;
   // Blue
   imgData.data[pos++] = colour.b;
   // Alpha
   imgData.data[pos++] = 255;
};
To simulate the speed, we will calculate the amount of screen bytes updated every screen update (25th of a second) based on the standard baud rate for the Spectrum loader in the ROM. From there, the rest is pretty simple!
Everything gets wrapped up in a jQuery plugin, my preferred method for implementing this sort of thing. And the only thing left to explain really is the Speccy screen memory side of things.
The ZX Spectrum Screen Memory Layout
At first glance, the Speccy video memory is a real confusing bag of tricks. It starts at 16384 (0x4000, the second 16K memory address and the start of RAM), is 6912 bytes long (the first 6k is the bitmap, the last 768 are colour attributes), and rows are far from contiguous.
With a screen resolution of 256 x 192, a quick bit of maths tells you that the values are far from arbitrary, being easily divisible by 8.
Putting colours aside, each pixel can be on or off, and horizontally the screen is divided into 32 rows of 8 pixels, where each set of 8 pixels is a byte in the screen memory. So far, much like many monochromatic displays of the era, easy peasy.
So the first 32 bytes of screen RAM, represent the first 256 pixels from the top left of the screen. The second 32 bytes, represent NOT the second row of 256 pixels, but the 8th row, and the third 32 bytes represent the 16th row.
If that wasn't confusing enough, once you get to the eighth set of 32 bytes, they jump back round to the 2nd row of pixels on the screen. Because the screen itself is divided into thirds.
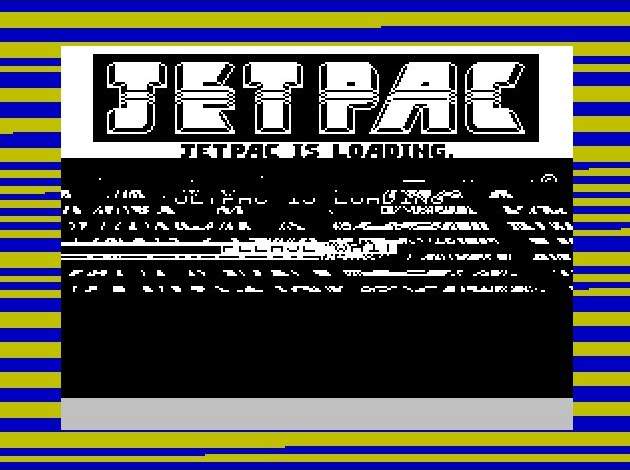
You can see this most clearly when early ZX Spectrum games are loading the title screen, because the baud rate is so slow you can watch it build up the screen as it loads the data contiguously into memory.
I don't confess to fully understand quite why the screen was done this way, other than to assume the reasons were probably cost related. Sinclair did after all not design this as a games machine, so efficiency of throwing sprites to a screen would have been far from their minds.
Since old computers always do these weird things for a reason, and that reason is always related to bits, there is a good way to convert X, Y coords into memory addresses, even with this strange system above.
High Byte:
  Bit        7      6      5      4      3      2      1      0
  Value  32768  16384   8192   4096   2048   1024    512    256
             0      1      0      T      T      L      L      L
You should be able to see straight away here that bits 5-7 will always be set such that the HL word references memory between 16384 and 24575, the latter address being higher than our screen memory area.
The letters T, L, R and C I'll explain in a moment.
Low Byte:
  Bit        7      6      5      4      3      2      1      0
  Value    128     64     32     16      8      4      2      1
             R      R      R      C      C      C      C      C
Bits 0-4 of the low byte marked as C are easy to follow, they represent the X column of the bitmap area. Since there are 32 columns (8 * 32 = 256 pixels), working out any given horizontal offset for a pixel byte is as easy as dividing it by 8. The pixel at position 5 is part of byte 0, (since 5 / 8 is 0.625, rounding down to 0), and the pixel at position 70 is byte 8 (70 / 8 is 8.75).
Things get confusing when we get to the y axis. The first thing we need to know is what third of the screen our coordinate resides in, we can do this by dividing it by 64, since there are 192 lines, three sets of 64. We set bits 3-4 of the high byte to the correct third (0 for the first, 1 for the second and 2 for the third).
The next task is which of the 8 rows our pixel is in, this is what Bits 5-7 of the low byte represent, the R being for row. And finally, which of the 8 lines in that row, Bits 0-2 of the high byte, aka L, represent that.
This is all very messy and quite annoying on the real spectrum at times. Sure you can do some simple maths to work out the right memory address, but it still isn't in any way easier than if it was a contiguous mapping like other machines. You can quickly increase the high byte (effectively adding 256) to move down a line, but this only works until you pass an 8x8 block, at which point you have to reset the L bits and increase the R bits, or if you cross a third, just the R bits (because the L bits overflow into the T bits).
The Colour Attributes
As for colours, these are pulled from the last part of screen memory, 768 bytes which each represent an 8x8 block, containing the foreground colour, background colour, a brightness bit and a flashing bit.
Bits 0-2 represent on/off states for blue, red and green respectively for the foreground. If you examine a 48K Spectrum keyboard you'll see that it has colours along the number row, with blue being above 1, red being above 2, and green above 4. This is no coincidence, as each of the aforementioned bits evaluate to the same numbers.
Other colours are combinations of these bits, so on the keyboard magenta is above 3 (since it is red + blue), cyan above 5, and so on.
Bits 3-5 represent identical on/off states for the background colour. And Bit 6 is the brightness bit, which adds about 25% to the voltage of the RGB values bringing them up to their maximum. Bit 7 is the flashing bit, and simply means twice a second (don't quote me on this) it flips the foreground and background.
Completely unlike the bitmap portion of the display, the colour attributes section is stored sequentially as you would expect, running left to right, top to bottom.